개인공부
개발공부 21일차 [웹개발종합반 2주차 2회 완강]
stella0905
2023. 2. 15. 17:00
Javascript 기초 문법
변수 & 기본연산
let a = 2
let b = 3

console.log(a+b) // 5

let c = '대한'
let d = '민국'

console.log(c+d) // 대한민국
리스트
let a_list = []  // 리스트를 선언. 변수 이름은 역시 아무렇게나 가능!

// 또는,

let a = ['사과','수박','딸기','감'] // 로 선언 가능

console.log(a[1]) // 수박
console.log(a[0]) // 사과

//리스트 길이 구하기
console.log(a.length) //4
딕셔너리
let a_dict = {}  // 딕셔너리 선언. 변수 이름은 역시 아무렇게나 가능!

// 또는,

let a = {'name':'영수','age':27} // 로 선언 가능
//key = name, age
//value = 영수, 27

console.log(a)
console.log(a['name']) // 영수
console.log(b_dict['age']) // 27
리스트와 딕셔너리의 조합
let a = [
	{'name':'영수','age':27},
	{'name':'철수','age':15},
	{'name':'영희','age':20}
]
console.log(a[0]['name']) //영수
console.log(a[1]['age']) //15
jQuery
<script src="https://ajax.googleapis.com/ajax/libs/jquery/3.5.1/jquery.min.js"></script><head></head>사이에 링크를 넣어서 사용 가능.
<body>
        <div class="top-part">
            <h1>자바스크립트 문법 연습하기!</h1>
        </div>
        <hr/>
        <br>
        <h2>1. 함수</h2>
        <div class="button-part">
            <button onclick="checkResult()">결과 확인하기!</button>
        </div>
        <div class="list-part">
            <h2>2. 리스트</h2>
            <div id="q1">테스트</div>
        </div>
function checkResult() {
let a = '사과'
$('#q1').text(a)
$('#q1').css('color','red')
}결과는 ‘결과 확인하기! ‘ 버튼을 눌렀을때 id = q1의 내용이(테스트) 사과로 바뀌고 폰트색상도 red로 바뀐다.
jQuery는 id를 지칭할때 $(’#아이디값’)으로 부른다.
반복문
fruits.forEach((a) => {
	console.log(a)
})
// fruits 의 요소를 하나씩 확인하는데 이름은 a라고 한다.
// a는 b,c,zzz,fruit 어떤 걸로 해도 상관 없다.
let fruits = ['사과','배','감','귤']
fruits.forEach((a) => {
console.log(a)
})
반복문은 리스트 안에 들어있는 값의 개수만큼 찍힌다.
조건문
if (조건) {
	// 조건에 맞다면~
} else {
	// 아니라면~
}
let age = 24
if (age > 20) {
console.log('성인입니다')
} else {
console.log('청소년입니다')
}
//답은 '성인입니다'가 찍힌다.let ages = [12,15,20,25,17,37,24]
ages.forEach((a)=> {
if (a > 20) {
console.log('성인입니다')
} else {
console.log('청소년입니다')
}
})
//답은 청소년입니다.(2번) 성인입니다.(2번) 청소년입니다. 성인입니다.(2번)
JQuery - append (html에 이어서 붙이기)
function checkResult() {
	let fruits = ['사과','배','감','귤','수박']
	$('#q1').empty()
	fruits.forEach((a)=>{
		let temp_html = `<p>${a}</p>`
		$('#q1').append(temp_html)
	})
    let people = [
	{'name':'서영','age':24},
	{'name':'현아','age':30},
	{'name':'영환','age':12},
	{'name':'서연','age':15},
	{'name':'지용','age':18},
	{'name':'예지','age':36}
]
$('#q2').empty()
people.forEach((a)=>{
		let name = a['name']
		let age a['age']
		let temp_html = `<p>${a}</p>`
		$('#q2').append(temp_html)
	})
}
Fetch
<기본골격>
fetch("여기에 URL을 입력").then(res => res.json()).then(data => {
		console.log(data)
})- fetch("여기에 URL을 입력") ← 이 URL로 웹 통신 요청을 보낼 거야!
- ← 이 괄호 안에 URL밖에 들어있지 않다면 기본상태인 GET!
- .then() ← 통신 요청을 받은 다음 이렇게 할 거야!
- res ⇒ res.json()
- ← 통신 요청을 받은 데이터는 res 라는 이름을 붙일 거야(변경 가능)
- ← res는 JSON 형태로 바꿔서 조작할 수 있게 할 거야!
- .then(data ⇒ {}) ←JSON 형태로 바뀐 데이터를 data 라는 이름으로 붙일거야
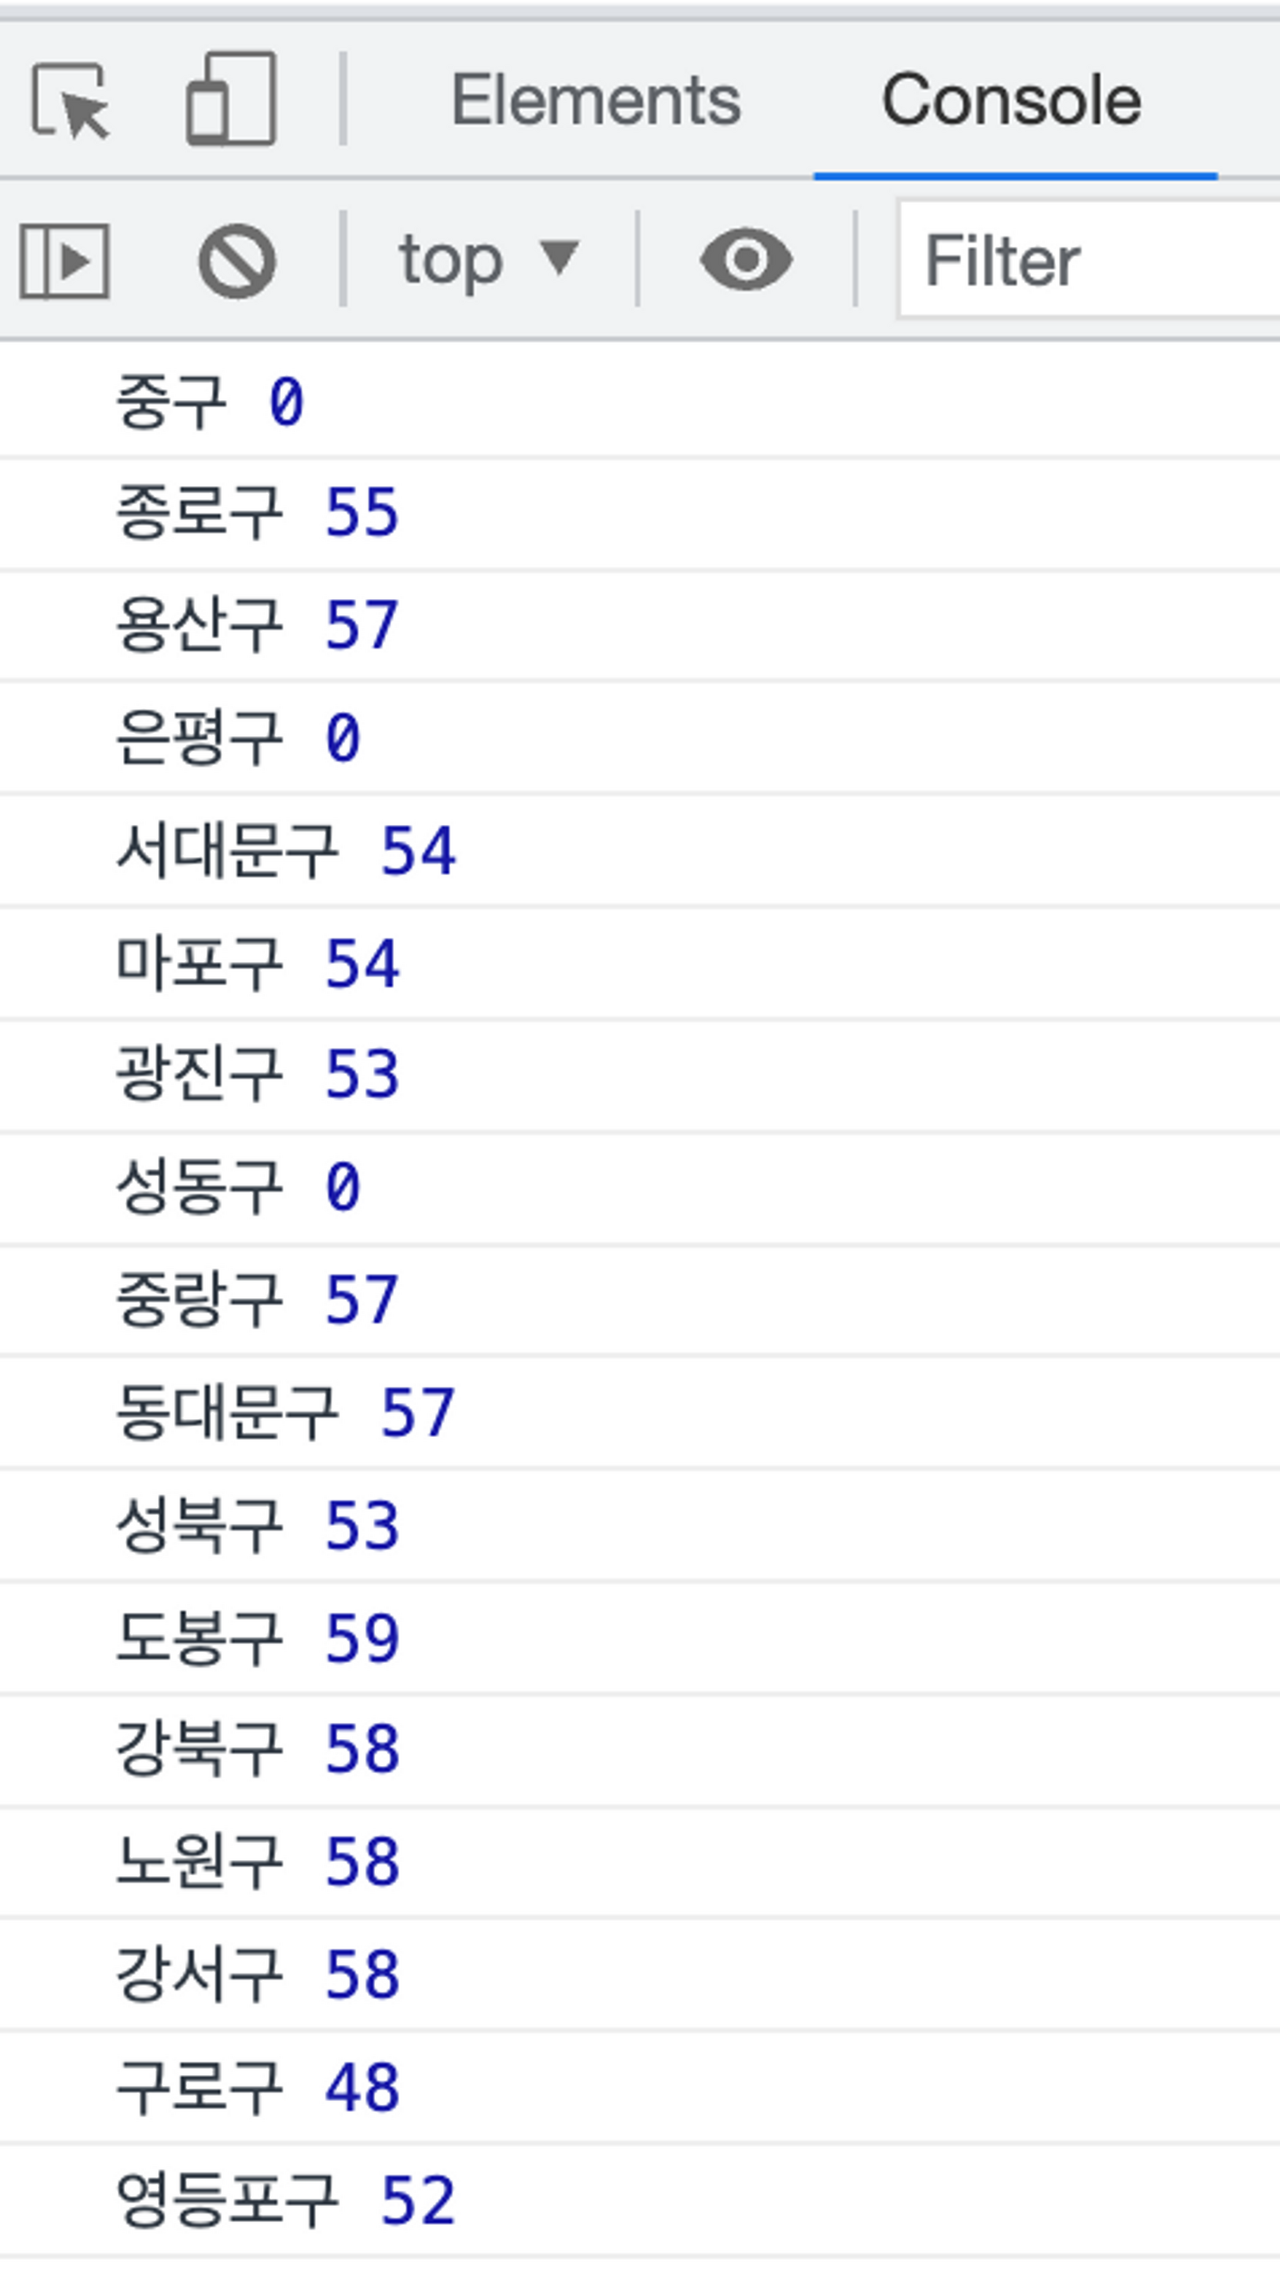
fetch("http://spartacodingclub.shop/sparta_api/seoulair") // 기본 요청(GET)
	.then(res => res.json()) // 요청해서 받은 데이터를 JSON화
	.then(data => { // JSON화 한 데이터를 다시 data로 이름짓기
		let rows = data['RealtimeCityAir']['row']
		rows.forEach((a) => {
			// 미세먼지 데이터 리스트의 길이만큼 반복해서 하나씩 개발자 도구에서 보기
			// 구의 이름, 미세먼지 수치 값을 개발자 도구에서 찍어보기
			console.log(a['MSRSTE_NM'], a['IDEX_MVL'])
		})
	})
미세먼지 수치가 40을 넘긴다면 빨간색을 줘야한다면? (조건문)
<style>
        div.question-box {
            margin: 10px 0 20px 0;
        }
        .bad {
            color: red;
        }
    </style>

    <script>
    function q1() {
        fetch("http://spartacodingclub.shop/sparta_api/seoulair").then((response) => response.json()).then((data) => {
            $('#names-q1').empty()
            let rows = data['RealtimeCityAir']['row']
            rows.forEach((a) => {
                let gu_name = a['MSRSTE_NM']
                let gu_mise = a['IDEX_MVL']
                let temp_html = ``
				if (gu_mise > 40) {
				    temp_html = `<li class="bad">${gu_name} : ${gu_mise}</li>`
				} else {
				temp_html = `<li>${gu_name} : ${gu_mise}</li>`
				}
                $('#names-q1').append(temp_html)
            });
          })
      }
    </script>
응용
따릉이 API 이용
<!doctype html>
<html lang="ko">

<head>
    <meta charset="UTF-8">
    <title>Fetch 연습하고 가기!</title>
    <!-- JQuery를 import 합니다 -->
    <script src="https://ajax.googleapis.com/ajax/libs/jquery/3.4.1/jquery.min.js"></script>

    <style type="text/css">
        div.question-box {
            margin: 10px 0 20px 0;
        }

        table {
            border: 1px solid;
            border-collapse: collapse;
        }

        td,
        th {
            padding: 10px;
            border: 1px solid;
        }

        .red {
            color: red;
        }
    </style>

    <script>
        function q1() {
            fetch("http://spartacodingclub.shop/sparta_api/seoulbike").then(response => response.json()).then(data => {
                $('#names-q1').empty()
                let rows = data['getStationList']['row']
                rows.forEach(a => {
                    let name = a['stationName']
                    let rack = a['rackTotCnt']
                    let bike = a['parkingBikeTotCnt']

                    let temp_html = ``

                    if (bike < 5) {
                        temp_html = `<tr class="red">
                                            <td>${name}</td>
                                            <td>${rack}</td>
                                            <td>${bike}</td>
                                        </tr>`
                    } else {
                        temp_html = `<tr>
                                            <td>${name}</td>
                                            <td>${rack}</td>
                                            <td>${bike}</td>
                                        </tr>`
                    }

                    $('#names-q1').append(temp_html)
                })
            })

        }
    </script>

</head>

<body>
    <h1>Fetch 연습하자!</h1>

    <hr />

    <div class="question-box">
        <h2>2. 서울시 OpenAPI(실시간 따릉이 현황)를 이용하기</h2>
        <p>모든 위치의 따릉이 현황을 보여주세요</p>
        <p>업데이트 버튼을 누를 때마다 지웠다 새로 씌여져야 합니다.</p>
        <button onclick="q1()">업데이트</button>
        <table>
            <thead>
                <tr>
                    <td>거치대 위치</td>
                    <td>거치대 수</td>
                    <td>현재 거치된 따릉이 수</td>
                </tr>
            </thead>
            <tbody id="names-q1">
                <tr>
                    <td>102. 망원역 1번출구 앞</td>
                    <td>22</td>
                    <td>0</td>
                </tr>
                <tr>
                    <td>103. 망원역 2번출구 앞</td>
                    <td>16</td>
                    <td>0</td>
                </tr>
                <tr>
                    <td>104. 합정역 1번출구 앞</td>
                    <td>16</td>
                    <td>0</td>
                </tr>
            </tbody>
        </table>
    </div>
</body>

</html>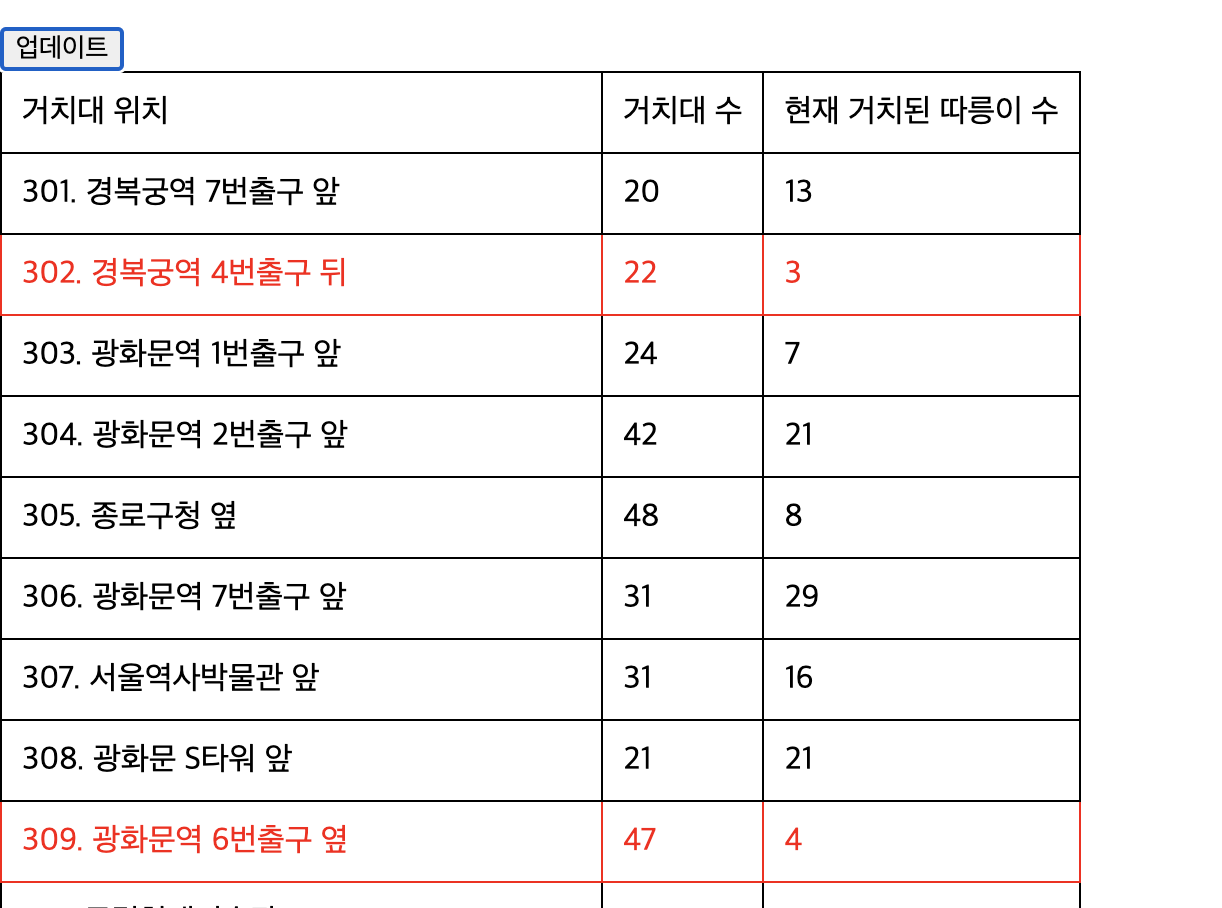
2주차는 그래도 5주차까지 계속 썼던걸 많이써서 그나마 2회독때는 금방금방 이해할 수 있었다.
근데 jqurey는 깊이 알필요없다고 들었지만 이 강의에서는 계속 사용을 하는데 .. 어떻게 해야할지 모르겠다
알고있으면 분명 좋겠지만 이거에 익숙해지면 안되고 .. ㅠㅠ 아직 코린이는 넘나 난처하다